이건 정말 Agent를 만들어야하는데...
사원들의 온보딩을 위해 회사업무에 필요한 질문에 대한 답변들을 제공해주는 챗봇을 개발하게 되었다. 노션도, 슬랙도 통합해야하고 사용자의 다양한 질문에 대답할 수 있어야했다. 꼼짝없이 Agent를 만들어야할 순간이 왔다. 이때까지도 번역을 위한 작은 RAG앱만 만들어본터라, Agent를 개발하는 것은 좀 막막했다. 심지어 시작은 신입 “개발자”들을 위한 챗봇이었다. 기본적인 회사 문서들 외에 코드베이스도 통합해야했다.
코드베이스 통합을 위해서 이리저리 찾아보다가 Codegen의 CodeAgent를 사용해봤다. CodeAgent를 사용하면서 어떻게 Agent를 개발해야하는지에 대한 많은 힌트를 얻었다. 내가 개발한 Agent도 CodeAgent와 크게 다르지않다. 그러면 먼저, CodeAgent가 어떻게 작동하는지 소개 문서에있는 코드를 살펴보자.
from codegen import CodeAgent, Codebase

# Grab a repo from Github
codebase = Codebase.from_repo('fastapi/fastapi')

# Create a code agent with read/write codebase access
agent = CodeAgent(codebase)

# Run the agent with a prompt
agent.run("Tell me about this repo")
CodeAgent는 인공지능이 필요에따라 코드베이스를 브라우징 할 수 있는 충분한 도구를 제공한다.
도구들을 몇가지 살펴보면:
- ViewFileTool: 파일의 내용과 메타데이터를 볼 수 있음
- ListDirectoryTool: 디렉토리 내용을 볼 수 있음
- SearchTool: 파일 혹은 심볼을 검색할 수 있음
CodeAgent에게 실제로 일을 시켜보니 꽤 만족스러웠다. 그래서 이게 어떻게 구현되어있나 뜯어보니 CodeAgent는 LangGraph의 ReAct Agent의 wrapper였고, Codegen 라이브러리 자체는 코드베이스 분석을 위한 도구들이 잘 정리되어있는 형태였다.
정리해보니, 내가 해야하는 건 크게 3가지였다.
- ReAct Agent를 이해하기
- Tool 제공하기
- Slack AI Assistant를 이용해 서빙하기
1. ReAct Agent를 이해하기
ReAct Agent란 뭘까? 여기서 ReAct는 ‘Reasoning and Acting’의 줄임말로, ReAct Agent는 인공지능이 단순히 질문에 답하거나 작업을 수행하는데 그치지 않고, 논리적 추론(Reasoning)을 통해 문제를 분석하고 그에따라 적절한 행동(Acting)을 하도록 설계된 Agent를 말한다.
이러한 ReAct Agent를 구축하는 방법은 프레임워크를 사용하면 간단하다. 특히, 아주 쉽게 시작하려면 LLaMaIndex를 추천한다. (정말 5줄만으로 ReAct Agent를 구축할 수 있다.) 나도 LLaMaIndex로 빠르게 PoC를 뽑아 간단히 가능성을 봤다. 다만 Langchain의 LangGraph에 비해 자료도 적은편이고 많은 것들이 추상화되어있어 커스터마이즈하기 어려웠다. 따라서 이 글에서는 CodeAgent의 레퍼런스도 있는 LangGraph를 기준으로 ReAct Agent를 만드는 방법을 살펴볼 것이다.
create_react_agent로 ReAct Agent 만들기
LangGraph의 create_react_agent 함수를 사용해보려하는데, 이 Parameter들이 무엇을 뜻하는지 알 수 없었다. model과 debug정도만...알았지 ㅋㅋㅋ
self.agent = create_react_agent(
    model=llm,
    tools=tools,
    prompt=prompt,
    checkpointer=memory,
    debug=debug
)
Agent 구성을 위해 특별히 주목해야할 Parameter들에 대해서 살펴보면 다음과 같다.
- tools: Agent가 접근할 수 있는 도구들
- prompt: 사용할 프롬프트
- SystemMessage 혹은 str로 제공받을 경우에는 모든 메세지의 앞에 더해진다.
- Runnable 또는 Callable로 제공할경우 프롬프트는 다음과 같은 input key들을 가져야한다.
- {tools}: 각 도구들에 대한 설명, Argument
- {tool_names}: 모든 도구들의 이름
- {agent_scratchpad}: 이전 도구 호출의 결과 (str)
- checkpointer: 후술 예정
- stop_sequence: List[str] 또는 Bool 값을 가진다. 기본값은 참. 참일경우 할루시네이션을 피하기 위해 “Observation:”이라는 스탑 토큰을 더한다.
prompt Paramter에 대한 설명을 보면 SystemMessage 혹은 str로 제공할 경우 기본 ReAct Prompt는 그대로 사용하는 것으로 보인다. 이 프롬프트에 Identity를 부여하거나, Tone of Voice라던지 수행해야할 목표를 적어주면 된다.
checkpointer라는 파라미터가 보인다. LangGraph에서는 Graph 내부 상태를 저장하는 방법으로 Checkpointer라고하는 영속성 레이어를 사용한다. 실제 프로덕트에는 인메모리에 저장되는 MemorySaver가아닌, SQLiteSaver 또는 PostgresSaver를 사용하라고 권고하고 있다. 하지만 내 경우에는 Slack API를 통해서 이전 대화를 얼마든지 불러올 수 있었고, 이전 대화를 몇 개 제공하는 것 만으로 충분했다. 따라서 MemorySaver를 사용하는대신 이전 대화에 대한 기록이 없을 경우 Slack API를 통해 제공되는 메세지 히스토리를 강제로 넣는 방법으로 처리했다.
# message_history: List[BaseMessage]

# thread에 대한 메세지 기록이 없다면 message_history를 넣어준다.
existing_messages = self.agent.get_state(config=config).values.get("messages", [])
if len(existing_messages) == 0:
    for message in message_history:
        self.agent.update_state(config, {"messages": message})
2. Tool 제공하기

Agent는 상태머신 내에서 주어진 도구(Tool)들을 필요에따라 사용하는 것을 반복하면서 최종 답변을 만들어낸다. 이 과정은 사람이 과제를 해결하는 과정과 비슷해보인다.
LangChain의 BaseTool을 상속받아서 자신만의 Tool을 만들 수 있다. 어떻게 만드는지에 대한 내용은 공식 문서를 참조하면된다. Tool을 만들때 신경써줘야하는 점은 바로 설명이다. 다음은 내가 만든 Agent의 SearchSlackTool인데, 이 툴이 가장 설명이 길어서 소개한다.
class SearchSlackTool(BaseTool):
    """
    Tool for searching messages and files in the Slack workspace using keyword.
    """
    name: ClassVar[str] = "search_slack"
    description: ClassVar[str] = """
        Search Slack workspace messages and files using keywords.
        This tool returns previews of matched messages with their permalinks. For detailed thread conversations, use the get_slack_thread_conversations tool with the 'permalink' from search results. Search tips:

        Use single words instead of phrases (e.g., "주차" instead of "주차 규정")
        Try different related terms if initial search yields no relevant results
        For technical topics, try both English and local language terms
    """

    def _run(self, keyword: str, k: int = 5, preview_length: int = 200) -> str:
        result = search_slack(keyword, k, preview_length)
        return result.render()
사람과 사람간의 대화라고 생각해보자. 질문이 “주차는 어떻게 해?”였을때, 질문을 받은 사람이 Slack에서 주차관련 정보를 알고싶다고하면 “주차”라고 검색해볼 것이다. 하지만 인공지능은 “주차 규정” 같은 식으로 쓸데없는 키워드를 많이 넣는 바람에 오히려 이상한 검색결과가 나왔다. 이를 방지하기위해서 구질구질한 설명을 꽤나 많이 추가했다. 설명을 개선하니 이전보다 훨씬 잘 검색한다.
좋은 설명을 덧붙이는 것은 올바른 사용을 유도하고, 좋은 결과를 낳는다.
Codegen CodeAgent를 보면서 느꼈던건 Tool들이 일관되게 구현되어있다는 점이다. 새로운 툴을 추가할때도 비슷한 패턴대로하면 훨씬 관리하기도 쉬워보였다. 아주 단순하게 묘사하자면 이런 구조다:
class MyTool(BaseTool)
    observation = call(func())
    observation.render()

def func() -> MyToolObservation
    try:
        # do something
        return MyToolObservation(success)
    except:
        return MyToolObservation(error)

class MyToolObservation(Observation):
    pass

class Observation(BaseModel):
    status: str # success | error
    def render() -> str:
        pass
Observation 클래스는 Tool Call의 상태(status)와 render() 함수를 가지고있는 pydantic BaseModel인데, Observation 클래스를 상속해서 각 도구에 맞는 구조화된 결과를 만들고, render 함수를 override하여 결과를 이쁘게 출력한다.
앞서 말했던 CodeAgent의 ListDirectoryTool와 ViewFileTool을 보면 출력 결과가 이런식이다:
ListDirectoryTool:
[LIST DIRECTORY] Found 3 results form /some/dir.
├── tools
├── index
└── agent
ViewFileTool:
[VIEW FILE] my_secret.txt
file size: 3024kb
---
나의 비밀은...쉿!
Observation 클래스를 중첩해서 더 쉽게 포맷팅 할 수 있다.
다음 예시는 노션 문서를 검색해서 리스팅하는 툴의 Observation 코드다.
class SearchResult(Observation):
    """Information about a single search result."""
    workspace: str = Field(
        description="Notion document's workspace"
    )
    page_title: str = Field(
        description="Title of the matching document",
    )
    page_id: str = Field(
        description="Page ID of the matching document",
    )
    score: float = Field(
        description="Similarity score of the match",
    )
    last_edited_time: str = Field(
        description="Last edited time of the document",
    )
    preview: str = Field(
        description="Preview of the document content",
    )

    def render(self) -> str:
        content = f"📄 Page ID: {self.page_id} (score: {self.score:.2f})"
        content += f"\n🔗 URL: <https://notion.so/{self.workspace}/{self.page_id.replace('-', '')}|{self.page_title}>"
        content += f"\n🕒 Last edited: {self.last_edited_time}\n---"
        content += f"\n{self.preview}\n"
        return content

class SearchDocumentObservation(Observation):
    query: str = Field(
        description="The search query that was used",
    )

    results: list[SearchResult] = Field(
        description="List of search results",
    )

    str_template: ClassVar[str] = "Found {result_count} results for '{query}'"

    def render(self) -> str:
        header = f"[SEARCH DOCUMENT]: Found {len(self.results)} results."
        lines = [header]
        for result in self.results:
            lines.append(result.render())
        return "\n".join(lines)

    def _get_details(self) -> dict[str, str | int]:
        """Get details for string representation."""
        return {
            "result_count": len(self.results),
            "query": self.query,
        }
이 툴을 호출하면 이렇게 표시된다.
================================= Tool Message =================================
Name: search_document

[SEARCH DOCUMENT]: Found 5 results.
📄 Page ID: xxxxxxxxxxxxx-a417-4fc2-a689-xxxxxxxxxxxxx (score: 1.35)
🔗 URL: <https://notion.so/xxxxx/xxxxxxxxxxxxx|운영팀>
🕒 Last edited: 2025-03-06T06:39:00.000Z
---
...
도구 호출결과에 URL에 명시되어있고 프롬프트에 어떤 정보를 바탕으로 답변하는지 출처를 반드시 기재하라고 했기때문에 Slack에서 사용하는 링크 포맷팅 방식을 사용하여 출처를 받을 수 있게 된다.
Response Formatting:
응답은 Slack의 Message Formatting을 따라야합니다.
- 유저: <@id> e.g <@U01ABCDEF>
- 유저그룹: <@id> e.g <@S01ABCDEF>
- 채널: <#id> e.g <#C01ABCDEF>
- URL: <http://www.example.com|title_of_link>
- *bold*, _italic_

주의사항:

1. 항상 문서의 내용을 살펴보고 문서의 내용을 충분히 이해했는지 확인 후 답변하세요.
2. 모든 답변과 설명에는 참조한 정보의 출처 URL을 명시하여 신뢰성과 추적성을 보장하세요. URL은 답변 하단에 목록으로 정리하세요. e.g - <URL or permalink|출처명>
3. Slack AI Assistant를 이용해 서빙하기
Slack에서 Bolt에 AI App을 쉽게 통합할 수 있도록하는 새로운 피쳐를 추가했다. 자세한 내용은 여기를 참조하면된다. 직원들이 편하게 쓸 수 있기도하지만, Slack의 API를 이용해 기존 대화내역을 불러올 수 있기때문에 인메모리 Checkpointer만으로도 큰 불편함 없이 대화를 지속가능하도록 할 수 있다.
@assistant.user_message
async def respond_in_assistant_thread(
    payload: dict,
    logger: logging.Logger,
    context: BoltContext,
    set_status: AsyncSetStatus,
    client: AsyncWebClient,
    say: AsyncSay
):
    try:
        await set_status("is typing...")

        replies_in_thread = await client.conversations_replies(
            channel=context.channel_id,
            ts=context.thread_ts,
            latest=payload["ts"], # 방금전 메세지를 기준으로 이전 메세지들을 가져옴
            inclusive=False, # 방금 전 메세지는 제외
            limit=MESSAGE_WINDOW_SIZE
        )

        for message in replies_in_thread["messages"]:
            if message.get('subtype', '') == "assistant_app_thread":
                continue # Thread 시작 메세지이므로 제외
            cls = HumanMessage if message.get("bot_id") is None else AIMessage
            message_history.append(cls(content=message))

        returned_message = await agent.arun(
            prompt=payload["text"], # 방금 질문
            thread_id=context.thread_ts,
            message_history=message_history,
            set_status=set_status
        )

        await say(text=returned_message)
    except Exception as e:
# ...message_history는 Agent의 thread 상태에서 메세지 기록이 없다면 추가한다.
config = {
    "configurable": {"thread_id": thread_id},
    "callbacks": [langfuse_handler]
}

# 메모리에서 스레드에 오간 메세지를 찾을 수 없다면
# 슬랙에서 넘겨받은 메세지를 올려서 영속성을 유지하는 것처럼 보이게함
existing_messages = self.agent.get_state(config=config).values.get("messages", [])
if len(existing_messages) == 0:
    for message in message_history:
        self.agent.update_state(config, {"messages": message})
완성!
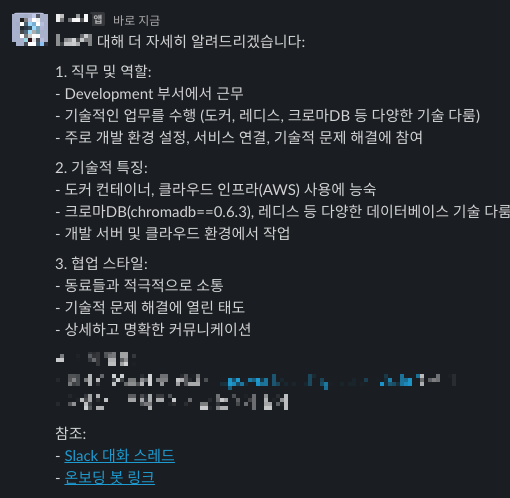
성공적으로 Agent를 구성하고 나에대해서 질문해봤다. 슬랙 프로필과 최근에 했던 말들에서 대충 어떤 사람인지 추측해서 결론을 낸 모습니다. 너무 단편적으로 본거같긴하지만...ㅋㅋㅋ
이번 포스트에서는 Agent 구축이 막막한 사람들을 위해 코드 공유없이 전체 과정에 대해서만 다뤄봤다. 사실 나는 많은 시간을 사내 Notion DB 통합에 쏟았다. 다음 포스트에서는 Notion RAG를 어떻게 구성했는지 공유해볼것이다.
'프로그래밍 > AI,ML' 카테고리의 다른 글
| LangGraph Agent에 장기기억(LTM)추가하기 (0) | 2025.04.03 |
|---|---|
| 반쪽짜리 Contextual Retrieval로 RAG 강화 해보기 (0) | 2025.03.26 |
| [ComfyUI] Workflow를 Python API로 만들기 (0) | 2025.01.21 |
| [ComfyUI] AI를 이용한 배너광고 자동 생성 워크플로우 (6) | 2025.01.17 |
| CivitAI 모델 wget으로 다운받는법 (0) | 2025.01.17 |